⬅ Back to Intro | Next → Part 4 - Traffic Management with VirtualService and DestinationRule
💡 This post is part of my Istio Hands-on Series — a practical journey into Kubernetes Service Mesh. Each post builds on the previous one with hands-on labs, real command outputs, and clear explanations aimed at learning Istio by doing, not just reading.
Objective
In this part, we dive into the heart of Istio’s data plane — the sidecar proxy — and understand how traffic actually flows inside the mesh.
By the end of this post, you’ll learn:
- Different Istio deployment modes (Sidecar vs Ambient)
- What sidecar injection means
- How to verify and inspect sidecars
- How traffic flows between services via Envoy
- How to troubleshoot and explore Envoy configuration
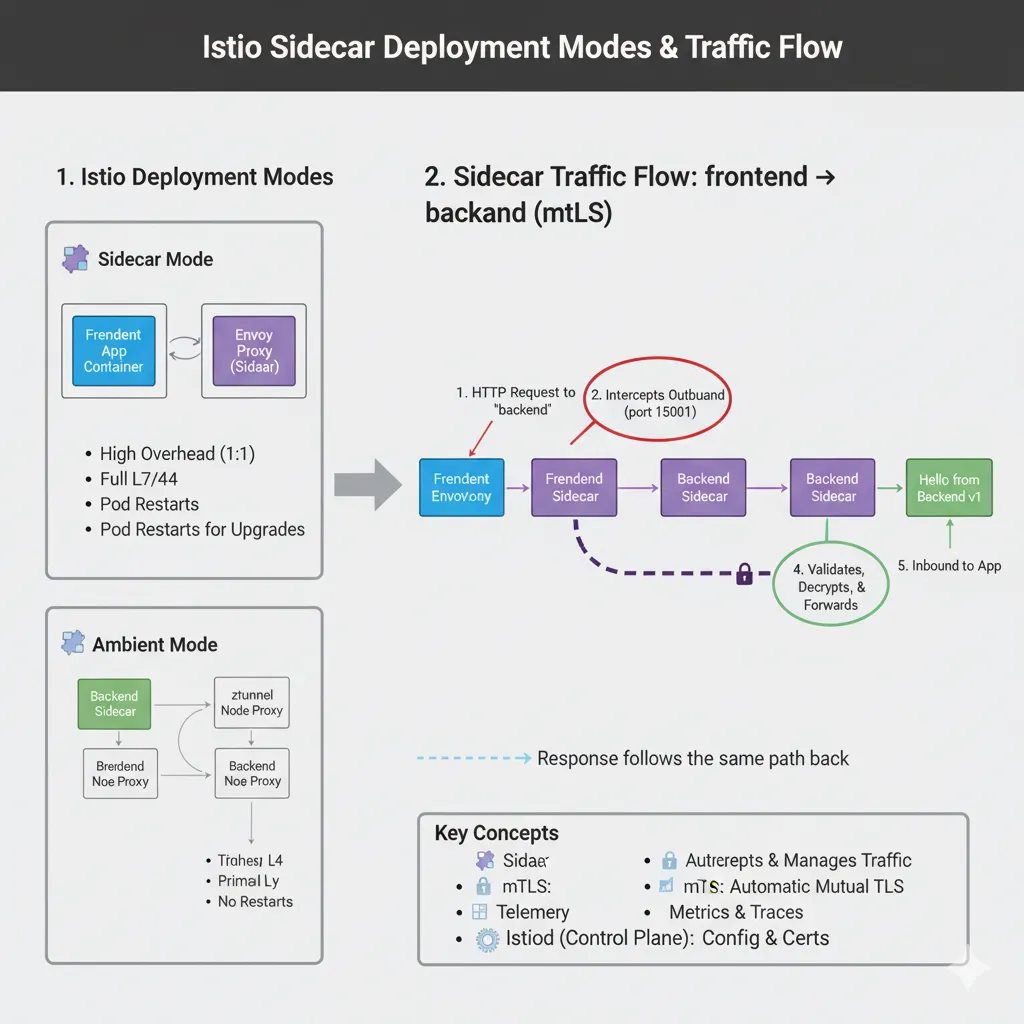
Step 1: Istio Deployment Modes — Sidecar vs Ambient
Istio can operate in two major modes:
| Feature | 🧩 Sidecar Mode | 🌫️ Ambient Mode |
|---|---|---|
| Architecture | Envoy proxy is injected as a container inside each pod | A lightweight ztunnel proxy runs at node level |
| Overhead | Higher — one proxy per pod | Lower — one proxy per node |
| Layer Support | Full L7 (HTTP, gRPC, routing, retries, fault injection) | Primarily L4 (TCP/TLS) by default |
| mTLS | Managed by sidecar per pod | Managed by ztunnel across nodes |
| Upgrades | Requires pod restarts | No pod restarts needed |
In this post, we’ll focus on Sidecar Mode, there will be a seperate post on Ambient Mode later.
Step 2: What Is a Sidecar?
A sidecar proxy is a lightweight Envoy container that runs alongside your application container in the same pod. It intercepts all inbound and outbound traffic, applying Istio’s policies, telemetry, and security.
Responsibilities of a Sidecar:
- Intercept and manage all inbound/outbound traffic
- Apply routing, retries, fault injection
- Enforce mTLS for secure service-to-service communication
- Collect metrics, logs, and traces for observability
Together, all sidecars form Istio’s data plane, while istiod (the control plane) distributes configuration and certificates.
Step 3: Enable Automatic Sidecar Injection
Label a namespace to enable automatic sidecar injection:
kubectl label namespace default istio-injection=enabled
Once labeled, Istio’s mutating webhook automatically injects Envoy sidecars into every new pod created in that namespace.
Step 4: Deploy a Sample Application
We’ll deploy a simple two-tier app (frontend and backend) to visualize Istio’s sidecar behavior.
4.1 Create the backend
cat <<EOF | kubectl apply -f -
apiVersion: apps/v1
kind: Deployment
metadata:
  name: backend
spec:
  replicas: 1
  selector:
    matchLabels:
      app: backend
  template:
    metadata:
      labels:
        app: backend
    spec:
      containers:
      - name: backend
        image: hashicorp/http-echo
        args: ["-text=Hello from Backend v1"]
        ports:
          - containerPort: 5678
---
apiVersion: v1
kind: Service
metadata:
  name: backend
spec:
  selector:
    app: backend
  ports:
    - port: 80
      targetPort: 5678
EOF
4.2 Create the frontend
cat <<EOF | kubectl apply -f -
apiVersion: apps/v1
kind: Deployment
metadata:
  name: frontend
spec:
  replicas: 1
  selector:
    matchLabels:
      app: frontend
  template:
    metadata:
      labels:
        app: frontend
    spec:
      containers:
      - name: frontend
        image: curlimages/curl
        command: ["sh", "-c"]
        args: ["while true; do curl -s http://backend; sleep 5; done"]
---
apiVersion: v1
kind: Service
metadata:
  name: frontend
spec:
  selector:
    app: frontend
  ports:
    - port: 80
      targetPort: 80
EOF
4.3 Verify Injection
kubectl get pods
✅ Expected output:
NAME                       READY   STATUS    RESTARTS   AGE
backend-684d96759f-p8psg   2/2     Running   0          35s
frontend-b7674d6f8-jjc42   2/2     Running   0          26s
Each pod should have 2 containers : your app + istio-proxy.
To confirm, describe a pod:
kubectl describe pod $(kubectl get pods |grep backend |head -1 |awk '{print $1}')
Look for annotations:
Annotations:
  istio.io/rev: default
  sidecar.istio.io/status: {"initContainers":["istio-init","istio-proxy"], ...}
That confirms Istio successfully injected the sidecar.
Step 5: Understand Traffic Flow in Sidecar Mode
Let’s visualize what happens when frontend calls backend:
- The frontend container sends an HTTP request to
backend. - Its Envoy sidecar intercepts the outbound traffic (port 15001).
- The request travels securely (mTLS) to the backend’s sidecar.
- The backend sidecar validates, decrypts, and forwards it to the backend container.
- Responses follow the same path back.
Check mTLS mode:
kubectl get pod $(kubectl get pods |grep backend |head -1 |awk '{print $1}') -o jsonpath='{.metadata.labels.security\.istio\.io/tlsMode}'
Expected:
istio
That means traffic is encrypted and authenticated via Istio’s certificates.
Step 6: Explore Envoy Configuration
You can use istioctl to view the live Envoy config.
List routes:
istioctl proxy-config routes $(kubectl get pods |grep backend |head -1 |awk '{print $1}')
View listeners:
istioctl proxy-config listeners $(kubectl get pods |grep backend |head -1 |awk '{print $1}')
Check overall proxy sync status:
istioctl proxy-status
✅ Both frontend and backend should appear as SYNCED , indicating their sidecars are up-to-date with Istiod.
Step 7: Check Envoy Access Logs
To see real-time traffic:
kubectl logs deploy/frontend -c istio-proxy --tail=10
You’ll see logs like:
[2025-11-06T12:28:43.548Z] "GET / HTTP/1.1" 200 - via_upstream - "-" 0 22 1 1 "-" "curl/8.17.0" "abccfcd4-8804-9de0-9cf8-86ac2937e85b" "backend" "10.244.0.12:5678" outbound|80||backend.default.svc.cluster.local 10.244.0.16:59050 10.96.245.140:80 10.244.0.16:33832 - default
[2025-11-06T12:28:48.563Z] "GET / HTTP/1.1" 200 - via_upstream - "-" 0 22 1 1 "-" "curl/8.17.0" "fb8782e3-211b-9d94-a6de-f0f179dedcc3" "backend" "10.244.0.12:5678" outbound|80||backend.default.svc.cluster.local 10.244.0.16:59050 10.96.245.140:80 10.244.0.16:33842 - default
[2025-11-06T12:28:53.578Z] "GET / HTTP/1.1" 200 - via_upstream - "-" 0 22 2 2 "-" "curl/8.17.0" "967db056-a4b4-9dde-a2b1-f730baf36b6b" "backend" "10.244.0.12:5678" outbound|80||backend.default.svc.cluster.local 10.244.0.16:58050 10.96.245.140:80 10.244.0.16:59848 - default
Your mesh is now fully operational — both frontend and backend communicate through Envoy sidecars , giving you secure, observable, and policy-driven traffic management.
🧵 Next Up
👉 Istio Hands-on Part 4 – Traffic Management with VirtualService and DestinationRule
We’ll start controlling traffic using canary releases, fault injection, and weighted routing.
⬅ Back to Intro | Next → Part 4 - Traffic Management with VirtualService and DestinationRule
Comments